Showing posts with label handprinted. Show all posts

Monday, March 1, 2010

1500 Coasters


1500 coasters is a formidable pile of paper.  15 stacks of 100 paper coasters.  
It all started with my friends moving party.  I talked her into the coasters because I thought they would be a challenge to design and print.  The result (for my animal loving friend) was a way too cute lab, in bright fushia.

  Yes, Rush (the labs name) stole my heart.  And began my odessy with coasters.
Before I could step up to the press I had to locate the coasters to print on.  Easy enough I thought.  Well, as it turns out, you can either by a few for way lots of money OR you can get 1500 for pretty cheap.
1500 coasters!!!! What was I going to do with enough coasters to build a dog house?  
Ha! 5 months later I placed my second order for 1500 coasters.  Turns out, coasters are a hot item. 
This posting is a look at some of those coasters that started coaster mania at Vermilion Star Press.
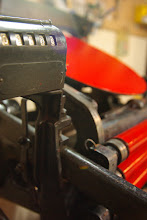
Note: printing on a circle takes a little care and practice.  Registration is a challenge- But hey, those 4" circles are hot.
 Simple and elegant, I received a request for this coaster.  Script reading "coup de foudre" (which is basically love at first sight in French-) and the location in a wonderful chocolate brown graced this coaster.


Vegas, anyone?  Sweet Roeanne from Guam needed some coasters delivered to the resort for her wedding. She requested something in yellow and navy blue.  She also needed a swanky font that fit the mood of a Vegas wedding.  (Here I would like to say that it is so interesting to work with people from all over!)


Okay, Halloween.  How could I resist?  These were mainly for fun.  A set witches printed in purple, green and orange paired with a couple of  pumpkin coasters.


Julia contacted me with a design pretty much already laid out.  In fact, she sent a cute rough sketch for me to check out.  A little fine tuning, selection of related fonts and we were pretty much in buisness.  On a print like this, it is always a little bit of a challenge to get the solid areas to print well without the smaller font/areas filling in.

 Martinis anyone?  The challenge was to create a coaster that would convey a clear message but still be stylish enough for the event.


A ton of Christmas coasters!


And then there was the coaster that we printed for Stephanie and Kelly.  Which in itself deserves it's own blog posting.
Why you ask?  Well, each color is printed seperatly.  Lined up precisely.  This coaster was front and back.  Three colors on the front and two colors on the back.  hmmm.  Yes, that means that each coaster was ran through the press 5 times!!!!


Okay, again the weakness for the marvelous color.  Another sweet dog lover contacted us for coasters.  Julie will get her own posting as well- because she sent great photos of her boston terrier.  Her new address and contact info is on the reverse making it great to sent off in the mail!!!

Saturday, October 24, 2009

Handset Type- A Pictorial


Sometimes when I mention handset type, I get a questioning look.  "What is that?" This little pictorial will help address that, I think.  While I am no expert, I can take pictures and I can set type.
This post will probably be extended over a few days- so check out the pictures and enjoy- let me know if you have any questions....

1. Simply put- each letter is a little piece of lead.  These are stored in type cases- which are held in cabinets.  (so, for each type of font- OR SIZE- you would have another case)
(Which is pretty amazing if you think of all the options you have with a computer- if it were handset type, how much room would it take?)


2.  You pick up your type- One letter at a time.


3. Put the type in a "composing stick."  You can adjust the stick to the appropriate size so it doesn't fall over on you.  (Also, you set you type right to left- kinda backwards.)


4. Each line of type needs space between it.  For that you have to cut a piece of lead- the correct length- measure, measure, measure.


5. You use a "slug cutter" to cut strips of lead in varying thicknesses.  I own a very old one (I think they might all be old!)  These give you the space between your lines of type- they also help to prevent your type from looking like it is sea sick.


6. Put those slugs in!  (Usually this is done on a galley tray- which you will see shortly)


7. (quick as this is, I am ready to PROOF- that means I run a proof of the form before production to check for mistakes.  (i.e. misspelled words, ,mixing up my p's and q's...)  I get to use my handy dandy proofing press- Lay down that ink!


8. Roll out the ink until it reaches the right consistancy-( it makes a wonderous sound- similiar to raincoat material rubbing against itself?)


9. Gently roll the ink over the form.- oh, see those rectangles?  They are industrial strength magnets that grip the press bed, not the lead type, and hold the type in place.  This prevents your type from getting squashed!


10. Roll the cylinder over the inked form to get an impression/proof.  The moment we have been waiting for...


11. Proofed!!! No backwards letters, no q's for my p's!
Final Product: The labels for our new rocket ship stationary

Now think about this; I only printed a few words.  What about paragraphs, pages, books...  The work involved.  At one point, not too long ago in our history, this was the only way to create printed material.

There are other means to creating type and using a "letterpress."  However, I try to use type whenever I can.  I strive to incorporate this in our work- even if I use a plate (as for the rocket ship that I drew) on other areas.

Thursday, October 22, 2009

Those Little Imaginations, Letterpress


If you have ever spent time with a preschooler you know they are exceptionally wonderous little people.  They are curious, explorative, unpredictable, loving, cuddly and imaginative.  I love the last quality.  Their imagination is amazing; it has yet to be squashed by this grown-up world we live in.  Their imaginations are so vibrant that you wonder where the line between imagination and the "real" world lies.  Sometimes I hear my little guy in the other room dreaming up fantastic scenarios (usually battles since he has an older brother).  Sound effects narrate these epic battles as his little body moves around the room.  I always have to smile.
   Adding to this imaginative quality is their ability to really vocalize now.  They have developed a vocabulary that helps them share their little make believe worlds.  Spending time listening to your little one is priceless.  Jump in to their world for a little bit.
   This all leads to a new letterpress line that I have been working on- The Super Fantastic Star Blaster Rocket Ship- whew I said it.  "It has to have a long title"- that you can give credit to my husband.  He is right.
The origins of all this...
Well, we were getting our little one prepped for the first day of pre-k.  We were preparing him for the inital drop off, what to expect during the day, his teachers name, he would have the most fun ever, his class  would be filled with new friends, that we would pick him and bring him home....
   Maybe I was starting to sound like the mom from Charlie Brown ,"wa wa wa wa, blah blah blah."
   My little guy listened to me and then said "Mom, meee gonna ride mine rocket ship when I out skoool.  Me gonna go to the moon."
   "Oh", I said. In those few lines I knew that he was gonna be okay.  His little hand was blasting off in the back seat- racing to the moon.

After I dropped him off I started drawing rocket ships and thought about our little guy going to the moon.  How wonderful are their first years.  The world is so big and colorful for them to explore.  I wonder what he will do next, in his imagination world.

The Super Fantastic Star Blaster Rocket Ship Stationary-
hand printed on 100% cotton paper.  So much fun. 
(Embracing Childhood)


Hold their little hands while you can, they grow quick.

Friday, October 16, 2009

Package Me Pretty


Packaging.
Hmm....
You know- I thought about it.  And I thought. And thought. I wanted packaging to be something special.  I wanted it to be personal.  I didn't want it to be wrapped in some generic piece of plastic.
   That is what is so great about selling stuff on etsy.  I CAN make it personal.  I attach peoples names to their item, not a number (we have them- but I am horrible with numbers!).  I get to sign a little card (letterpress of course) and tuck it in.  I can adorn their packages with simple stuff- coordinating ribbon, matching tissue paper, and other little surprises.  Yummy!
 I remember the first time I ordered something on etsy.  I got a great little package- stuff just kept falling out of it.  Wow, this is great!  It is soo cool to recieve these things.  Neat little things.  Little surprises.  Just like when you were a kid getting mail.

 
That is what I want my packages to be like.  I want the reciever to open it and feel the excitement of getting something addressed to you- then opening it; even better.  I want people to remember not just the great handprinted letterpress- but the way it arrived.
Presents in the mailbox.  Why not?  I mean- isn't that what buying handmade should be?  Personal- exciting- quality?  Fun!  It should be fun!
(Of course- I love, love, love to wrap stuff up.  I like to try and imagine what their faces will look like.)
So for now- gotta go wrap a few more things.
(And if you buy something- let me know how you like your wrappings!)